Deploy AI agents to your entire organization via IdP
This guide walks you through the full setup for giving external users access to your AI agents via your Identity Provider — without creating individual CustomGPT.ai accounts.
For an overview of what this feature is and when to use it, see End-user IdP access overview.
Prerequisites
Before you begin, confirm you have the following:
- A CustomGPT.ai Teams plan with the IdP end-user access feature enabled. Contact sales if you are not sure whether this is active on your account.
- SSO already configured for your organization. See SSO setup if you have not done this yet.
- A custom attribute ready to be configured in your IdP. Your IT team will handle this- see Step 2 for what they need to know.
- Account Owner access in CustomGPT.ai, or access from a non-organization account (an account that existed before being added to the organization).
Step 1: Set your agents to Private visibility
Before configuring IdP access, ensure the agents you want to protect are set to Private visibility.
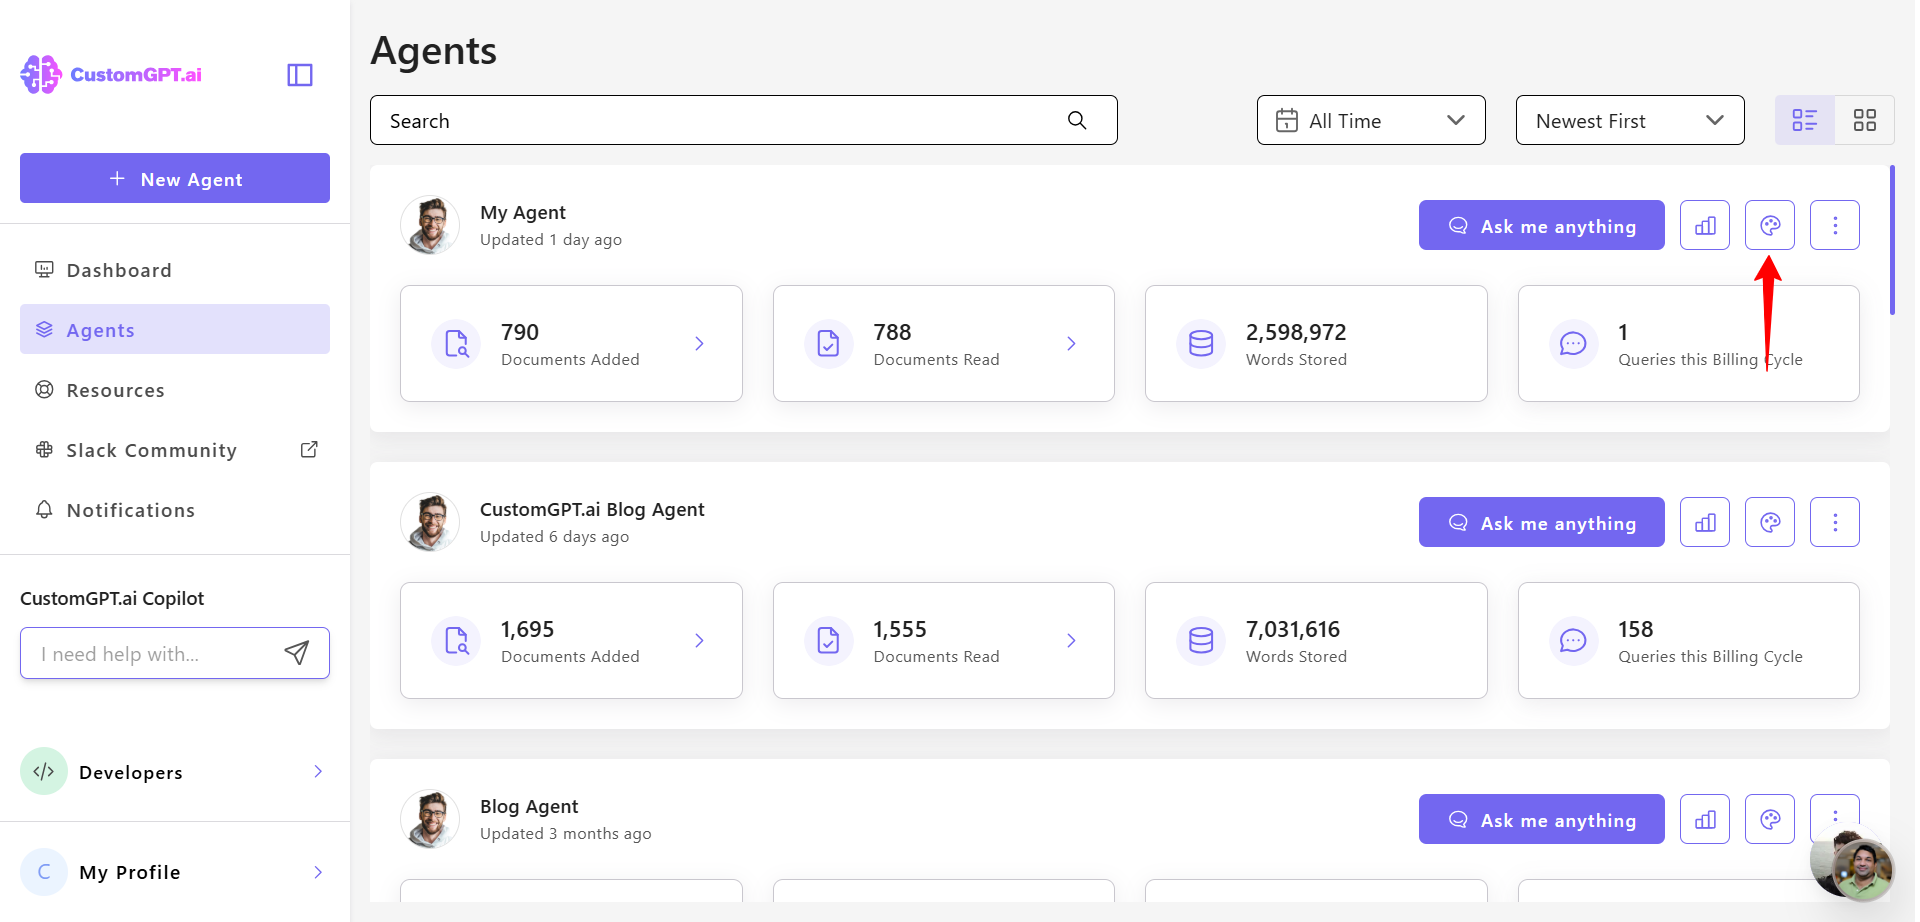
- Go to your agent's Personalize setting
- On the Personalize page, click on the Security tab
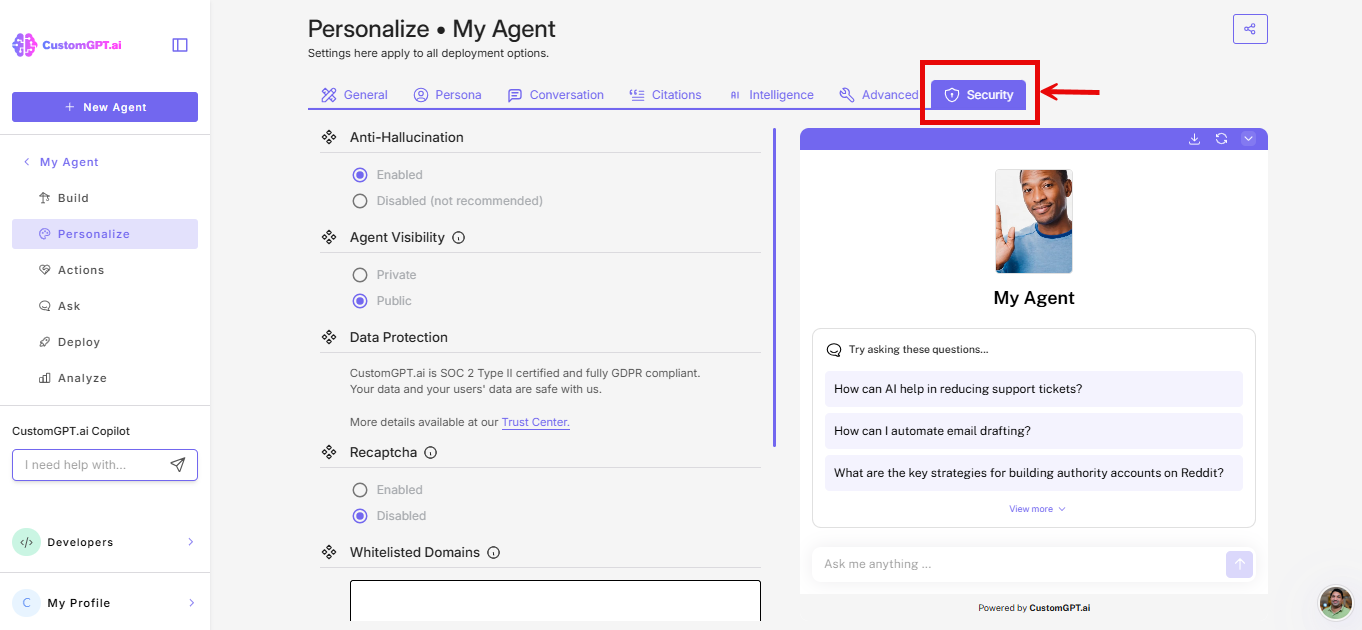
- Scroll to Agent Visibility, select Private
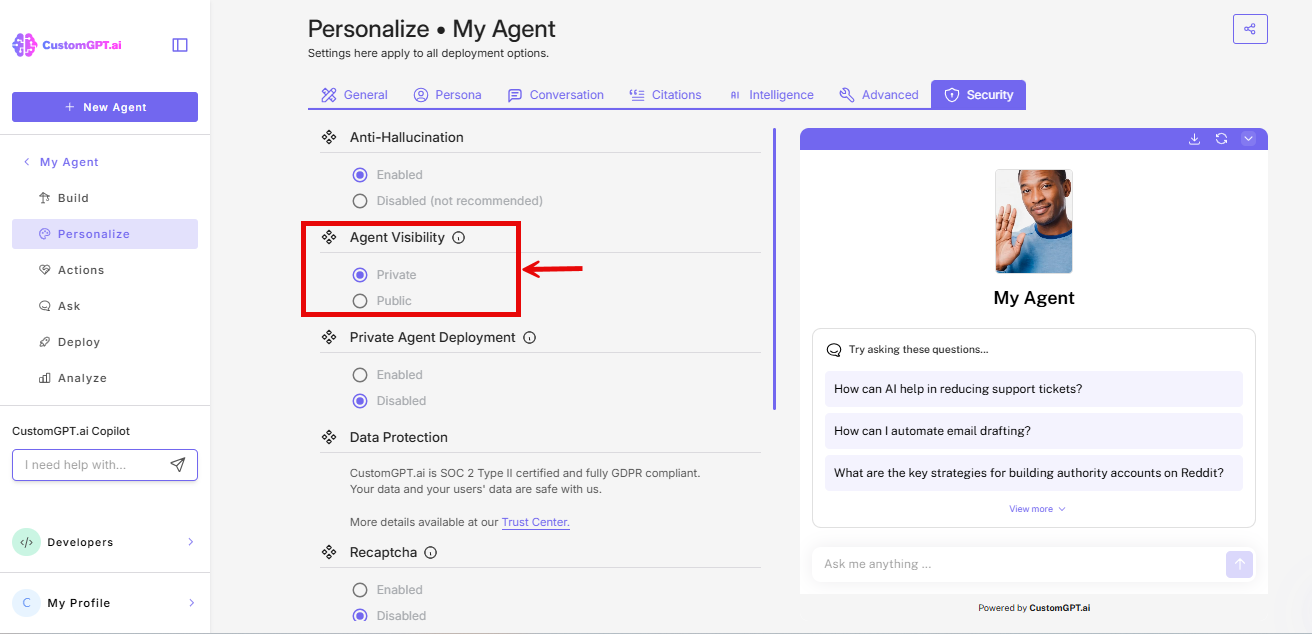
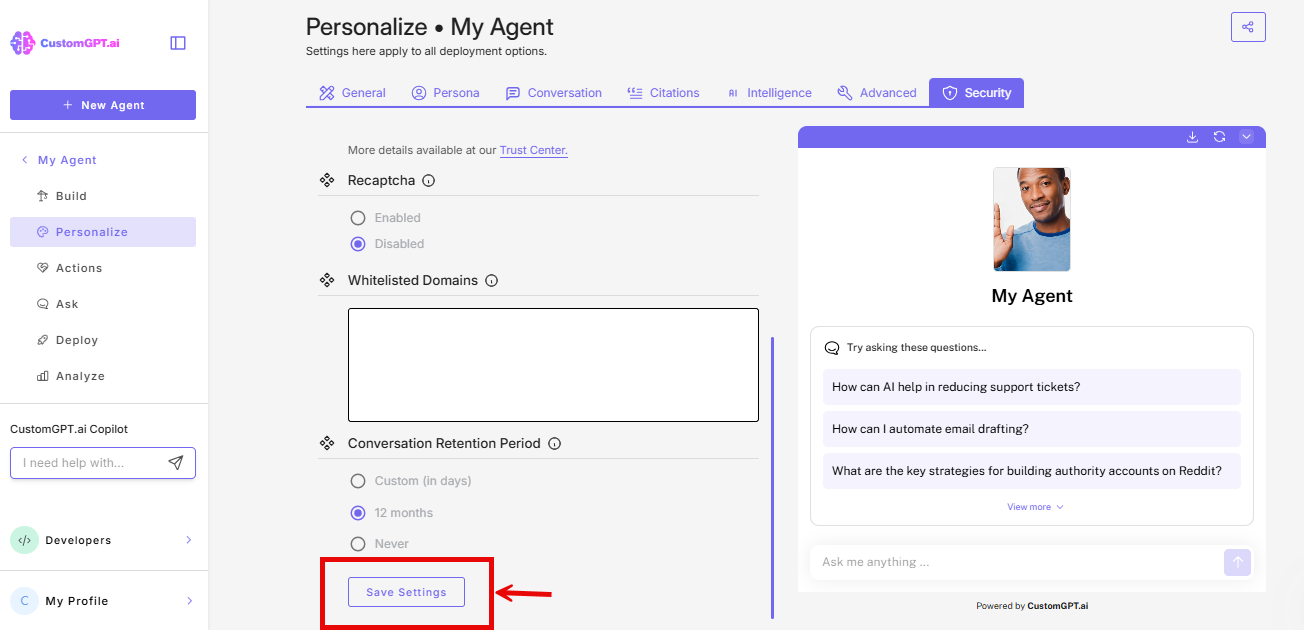
- Click Save
ImportantAgents must be set to Private for IdP-based access control to work properly. Public agents can be accessed by anyone without authentication.
Step 2: Configure an attribute in your IdP
Work with your IT team to configure a custom SAML attribute in your Identity Provider. This attribute will tell CustomGPT which role(s) to assign to each user.
What CustomGPT needs:
| Requirement | Details |
|---|---|
| Attribute name | You choose (e.g., customgpt_role)—you'll enter this in CustomGPT later |
| Attribute value | Must exactly match a role name you create in CustomGPT |
| Case sensitivity | Case-sensitive—Sales-Team ≠ sales-team |
| Maximum length | 255 characters |
| Reserved names | Cannot use: Owner, Administrator, Team Administrator, Chat-only, Member, Super Admin |
NoteThe specific steps to create and assign custom attributes vary by IdP. Consult your IdP's documentation or your IT team for implementation details.
Step 3: Create matching roles in CustomGPT
Create a role in CustomGPT.ai that exactly matches each attribute value you configured in your IdP.
- Go to Teams → Roles
- Click Create Custom Role
- Configure the role:
- In the Agents section, select which agents this role can access
- Click Submit
Critical: The role name must be an exact, case-sensitive match to the attribute value from your IdP. If your IdP sends
partner-support, your role must be named exactlypartner-support.
Step 4: Enable IdP End-User Access in CustomGPT
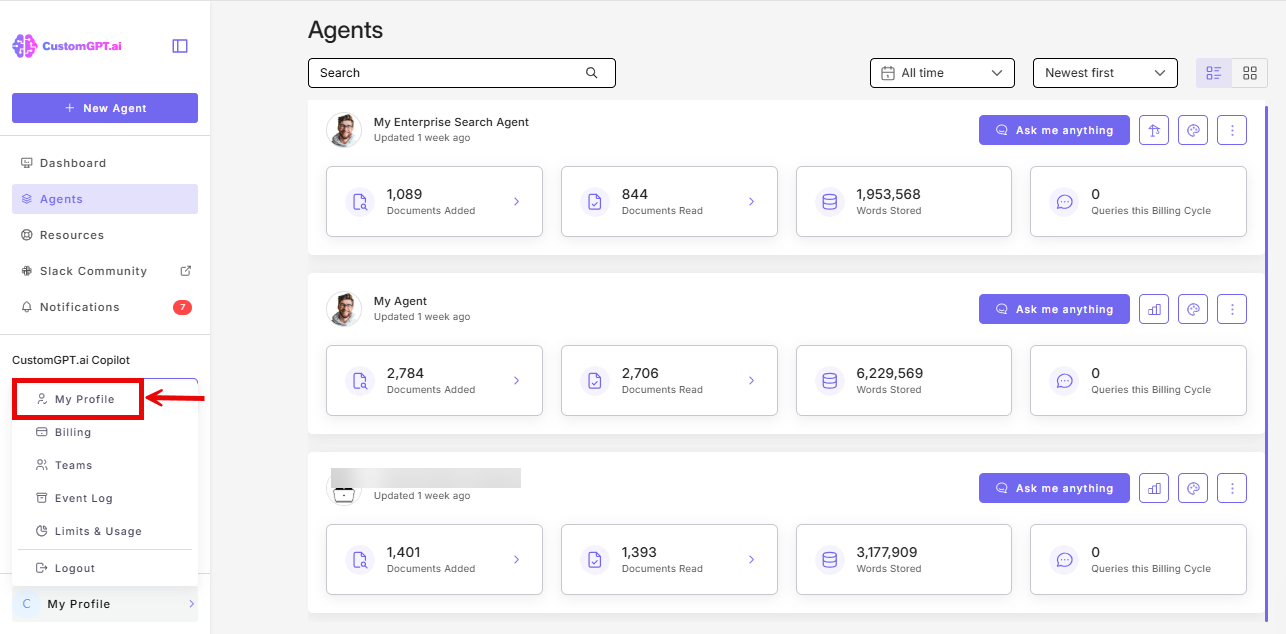
- Click My profile icon in the bottom-left corner
- Click My Profile from the dropdown
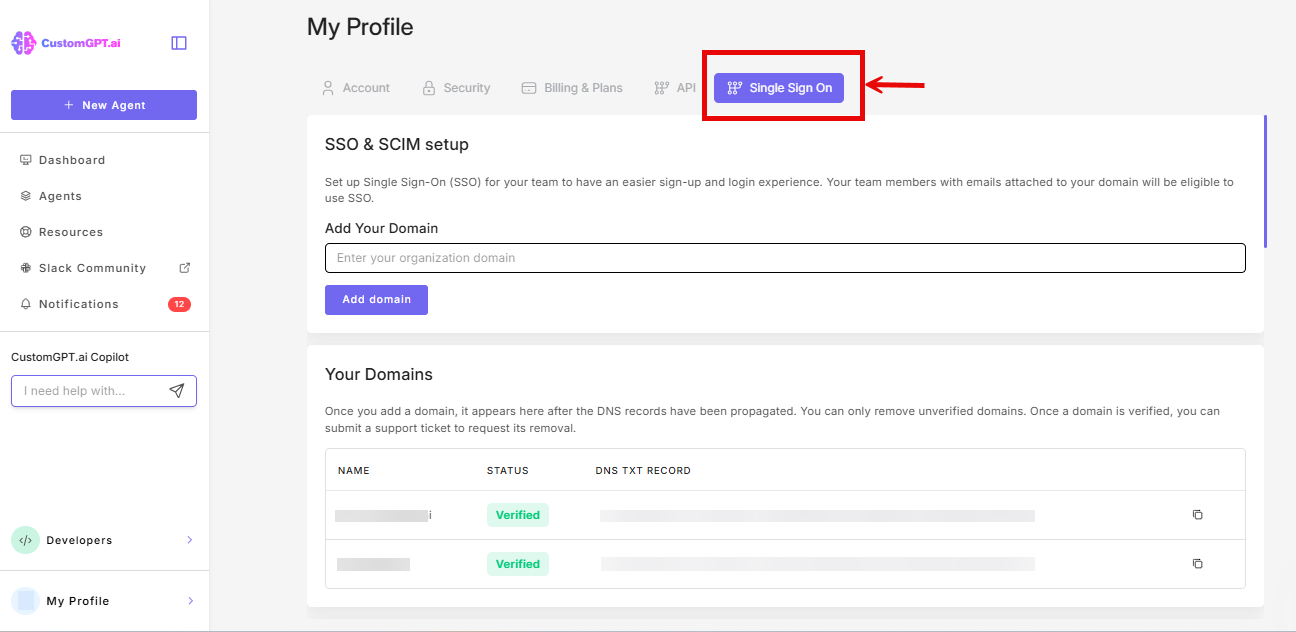
- Click the Single Sign On (SSO) tab
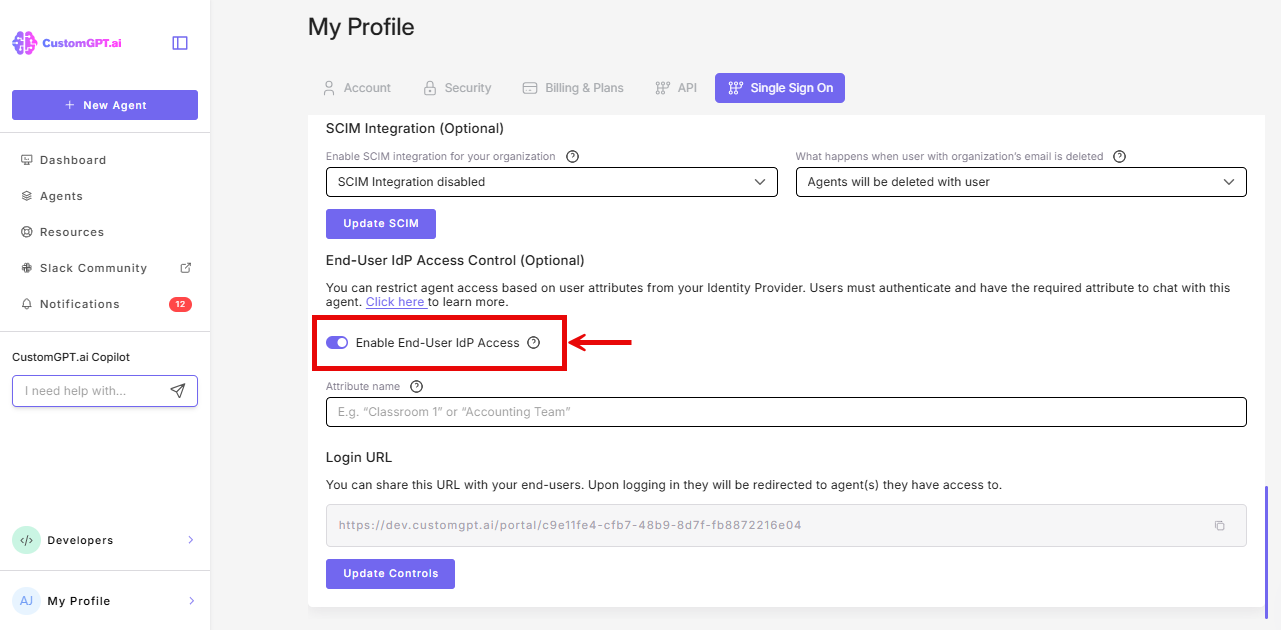
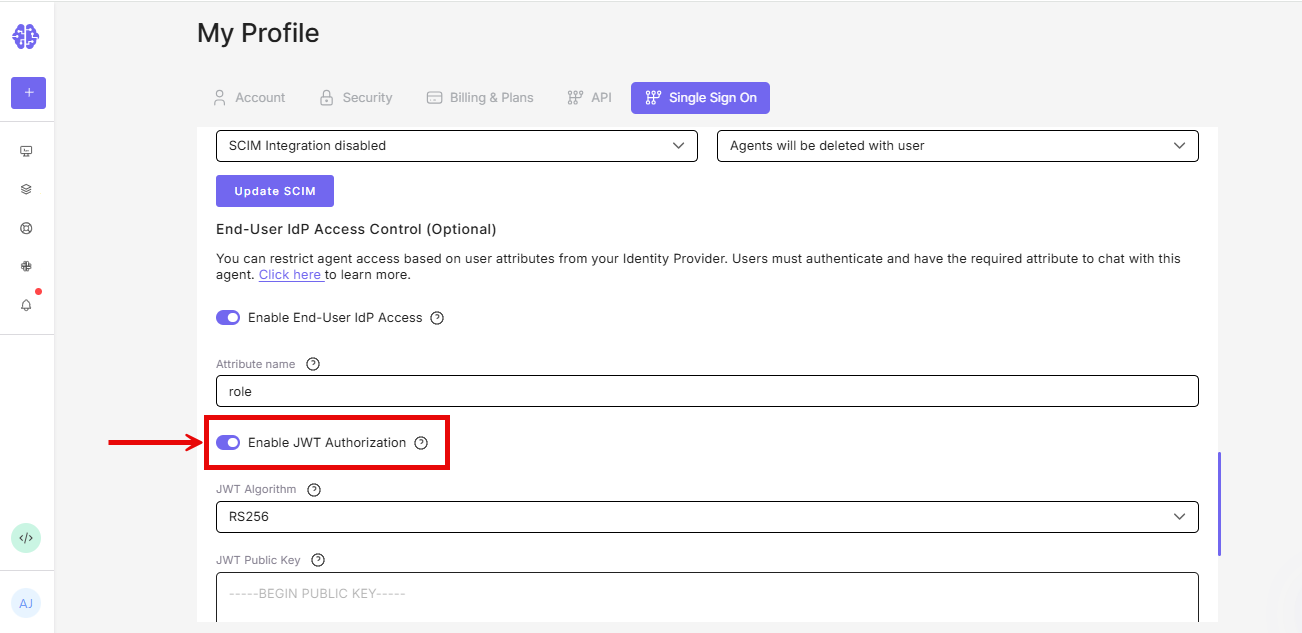
- Scroll to the IdP End-User Access Control section, and toggle On Enable End-User IdP Access
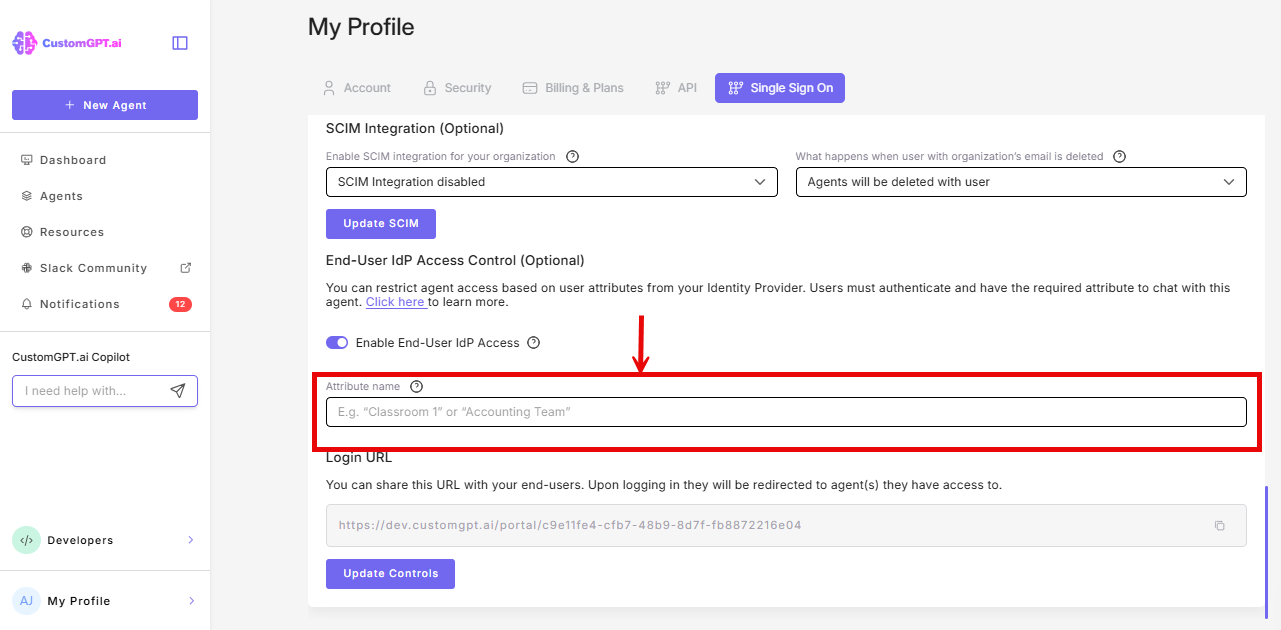
- Enter the attribute name you configured in your IdP (e.g.,
customgpt_role)
- Optional - JWT auto-login: If your website already authenticates users and you want them signed in to the embedded agent automatically, enable JWT Authorization. Choose a JWT algorithm (RS256 is recommended) and paste the matching public key. See Enable JWT login for embedded agents for the full setup.
- Click Update Controls
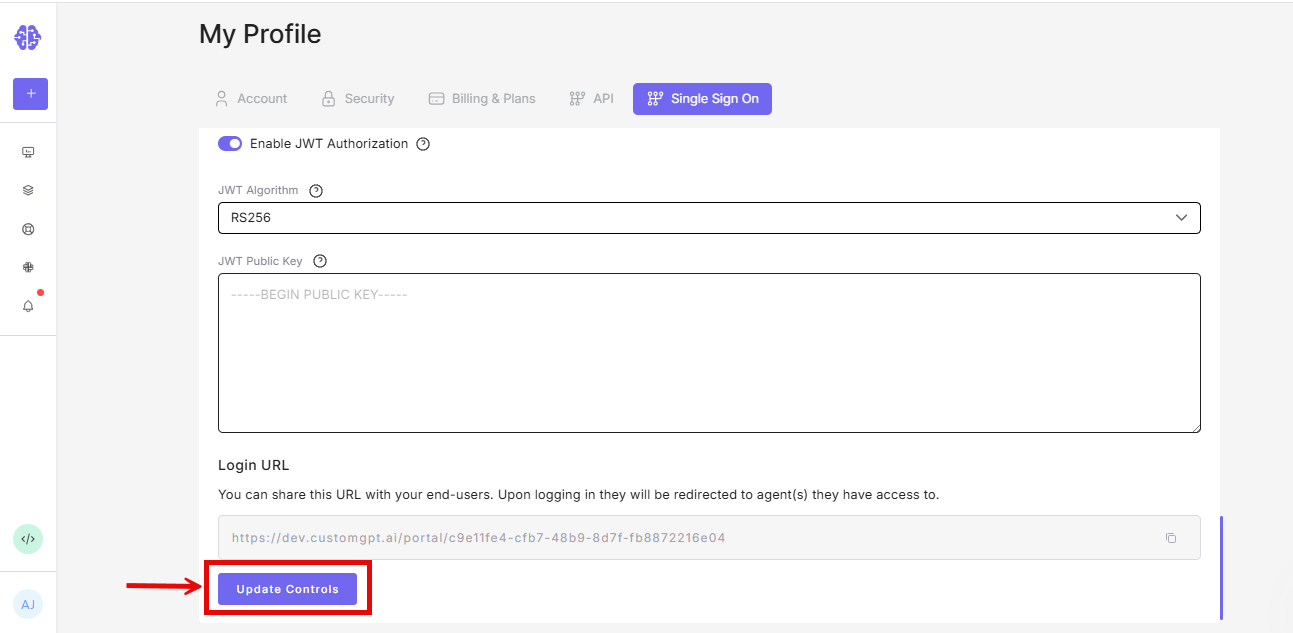
- Copy the generated Portal Login URL
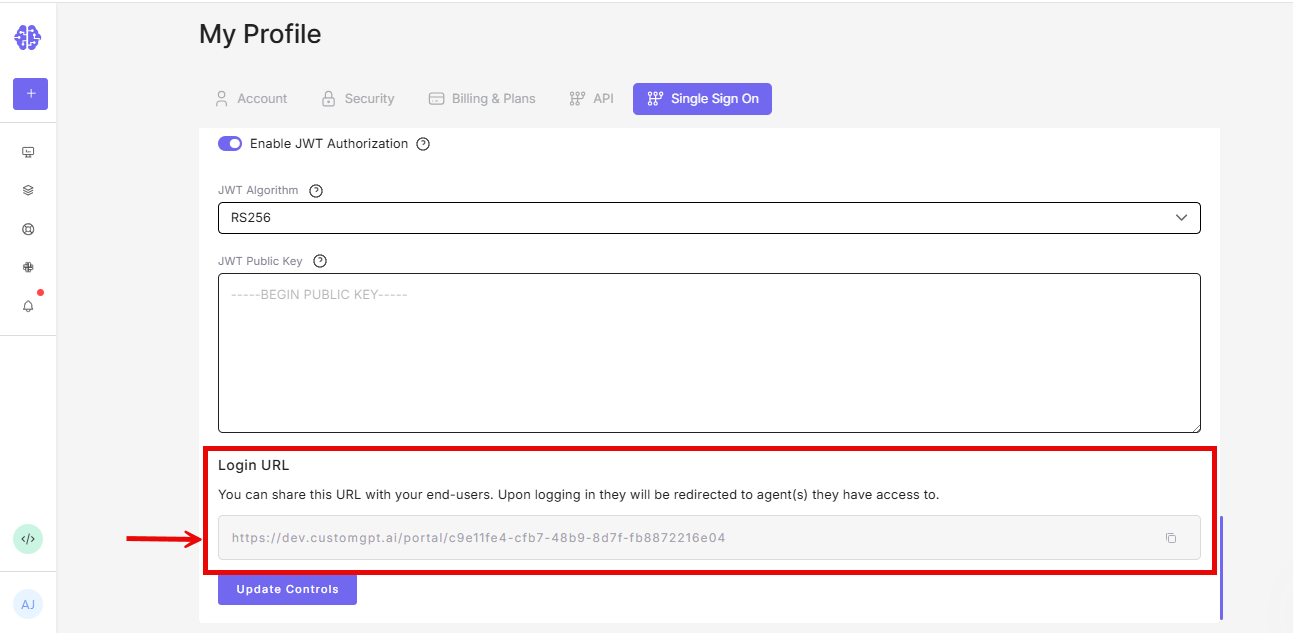
Portal URL format The URL is unique to your organization and looks like:
https://app.customgpt.ai/portal/[random-string]
Step 5: Choose your deployment method
You can give external users access through a portal URL, an embedded agent, or both. The setup steps differ slightly depending on which method you use.
Option A: Portal URL
No additional configuration is needed. Share the Portal Login URL you copied in Step 4 with your external users via email, intranet, LMS, or any communication channel.
When users visit the URL, they are redirected to your IdP for authentication. After signing in, they land on their assigned agent (if one) or a portal listing all agents their role permits (if multiple).
Option B: Embedded agent
If you want to embed an IdP-protected agent directly on a web page (your intranet, a partner portal, a course platform), additional configuration is required.
For the full embed setup walkthrough, see Deploy IdP-access controlled agent to external website.
The key steps are:
- Set the agent's visibility to Private and select Enabled (IdP) under Private Agent Deployment in Personalize → Security.
- Copy the embed code from the agent's Deploy page and paste it into your web page's HTML.
Users visiting the page will see a "Sign in to chat" button. Clicking it opens an IdP authentication popup. After signing in, the popup closes and the chat interface loads but the user never leaves the page.
If you configured JWT Authorization in Step 4, users are signed in automatically - no button or popup. To know more, refer 👉 Enable JWT login for embedded agents.
Both methods use the same access control
Whether external users access agents through the portal URL or an embedded widget, the same roles, attributes, and session rules apply. You can use both methods simultaneously.
Step 6: Test the configuration
- Open an incognito/private browser window
- Navigate to your Portal Login URL
- You should be redirected to your IdP for authentication
- Log in with a test account that has the correct attribute value
- After authentication:
- If the role has access to one agent: you're redirected directly to chat
- If the role has access to multiple agents: you see a portal listing all accessible agents
Testing with embedded agents: For embedded deployments, visit the page where you pasted the embed code. Verify that the "Sign in to chat" button appears, that the authentication popup opens and closes correctly, and that the chat interface loads after login.
What external users experience
This section gives a brief summary. For a full explanation of both the portal and embed flows, including what to communicate to your users before rollout see How external users sign in to your agents.
Session behavior
| Aspect | Behavior |
|---|---|
| Session duration | 24 hours from first authentication. This is fixed and not configurable. |
| Session expiry | User must re-authenticate via your IdP. |
| Conversation continuity | Each authentication starts a new conversation. History is not preserved between sessions. |
| Account creation | None. External users are never created as accounts in CustomGPT.ai. |
| User limit | No limit. Any number of external users can authenticate and access agents. |
| Branding | External users see the agent interface only. The only CustomGPT.ai branding is the "Powered by CustomGPT" badge, which can be removed via white-labeling. |
Agent access
- Single agent: User goes directly to the chat interface
- Multiple agents: User sees a selection portal and chooses an agent
- Switching agents: User can revisit the Portal URL to select a different agent (within the 24-hour session)
- No "back to portal" button: Once in a chat, users must use the Portal URL again to switch
Choosing the right access method
| If you need... | Use this approach |
|---|---|
| Access for 100+ users with minimal management | IdP End-User Access (this feature) |
| Individual user tracking and conversation history | Private Agent Deployment with CustomGPT accounts |
| Quick setup without IdP | Public agent with reCAPTCHA |
| Full user management and permissions | CustomGPT Teams with invited users |
IdP access vs. traditional accounts
| IdP End-User Access | Traditional user accounts |
|---|---|
| No user limit | Users count against plan limits |
| No invitations needed | Must invite each user |
| IdP is single source of truth | Manage access in two places |
| Anonymous analytics | Per-user tracking |
| No conversation history | Persistent conversation history |
| Requires existing IdP | Works without IdP |
Current limitations
- Deployment: IdP authentication is only triggered via Portal URLs and embedded agent deployments - other sharing methods (direct link, API) do not support IdP access control.
- Custom domains: Portal URL cannot be customized or white-labelled at this time
- Analytics: Cannot track usage by role or see which attribute was used
- Audit logs: Detailed access audit logs not available yet
- Session duration: Fixed at 24 hours, not configurable
- Access revocation: Changes to IdP attributes or roles take effect on the user's next authentication. Active sessions continue until they expire up to 24 hours. There is no way to terminate an active session. See Update and revoke external agent access for revocation procedures.
- Agent switching: There is no "back to portal" button inside the chat interface. Users must navigate to the Portal URL again to switch agents.
Troubleshooting
Users receive 403 Forbidden errors
This error appears when access cannot be granted. Check that:
- Your IdP is sending the correct attribute name
- The attribute value exactly matches a role name in CustomGPT (case-sensitive, no extra whitespace)
- The role has at least one agent assigned
- The assigned agents are set to Private visibility
Access changes aren't taking effect
Attribute changes in your IdP take effect on the user's next authentication. Active sessions continue until they expire (up to 24 hours).
Users can't continue previous conversations
Each authentication via the portal starts a new conversation. Conversation history is not preserved between sessions for IdP end-users.
For persistent issues, contact support.
Users cannot chat even though they logged in
The matched role likely does not have chat permissions enabled. Edit the role in Teams → Roles and confirm that Permissions is set to Chat Only and that the create conversation permission is enabled.
Users see no agents after authenticating
The matched role has no agents assigned, or the assigned agents have been deleted or set to Public. Check the role configuration in Teams → Roles and verify agent assignments.
The portal URL is not working
Verify the following:
- SSO is properly configured and active.
- The IdP attribute name is entered correctly in your SSO settings (Step 4).
- The IdP end-user access feature is enabled on your Enterprise plan.
- You are using the correct portal URL (copy it again from My Profile → SSO tab).
Related guides
- End-user IdP access overview
- Deploy IdP-access controlled agent to external website
- Enable JWT login for embedded agents
- How external users sign in to your agents
- Update and revoke external agent access
- SSO setup
- Create custom roles
- Create agent-specific custom roles
Updated about 2 months ago